Set up Immerss on your Shopify store
Install the AI + human sales widget, connect your catalog, and go live — no code. Most stores finish in about 15 minutes.
Before you start ~15 min · no developer
- Admin access to your Shopify store
- Your brand logo and colors handy
- A published Shopify theme
- You'll end with a live, branded assistant
Find the Shopify app
In the Shopify App Store, search for Immersive Shopping & Videos.
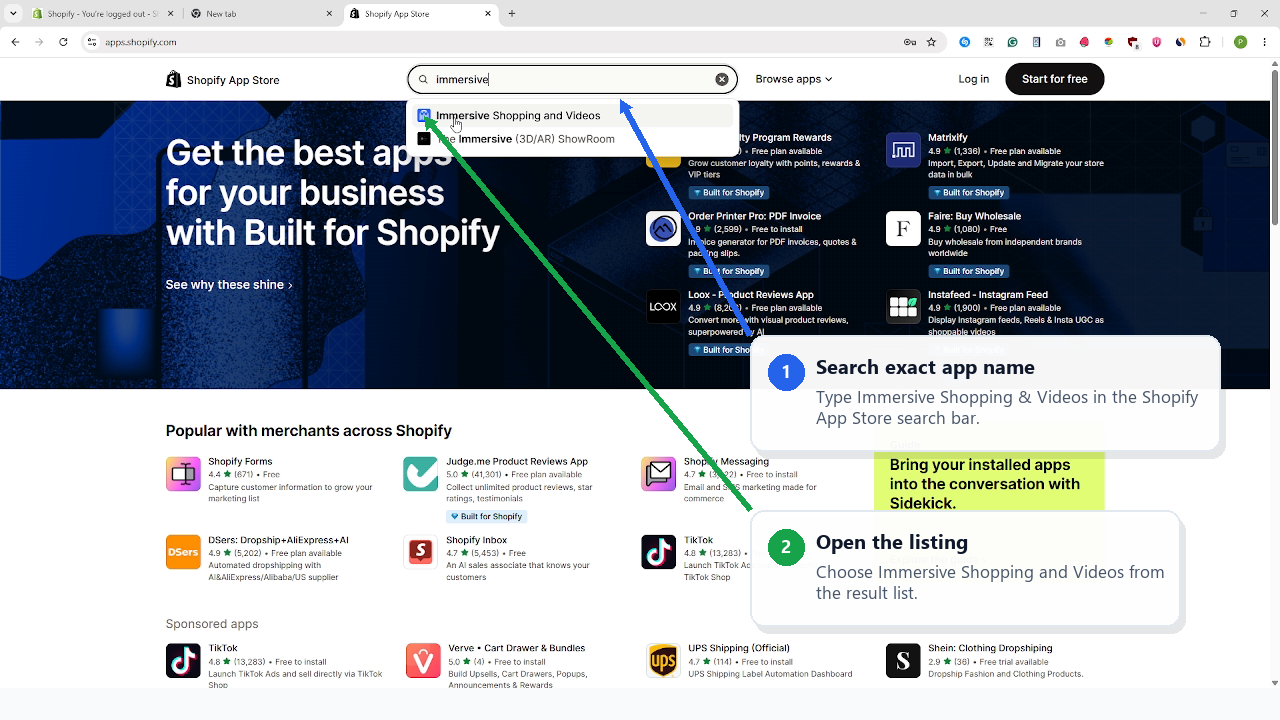
- 1Search the exact name
Type “Immersive Shopping & Videos” in the App Store search bar.
- 2Open the listing
Choose Immersive Shopping and Videos from the results.
Start installation
Click Install and log in with the store account.
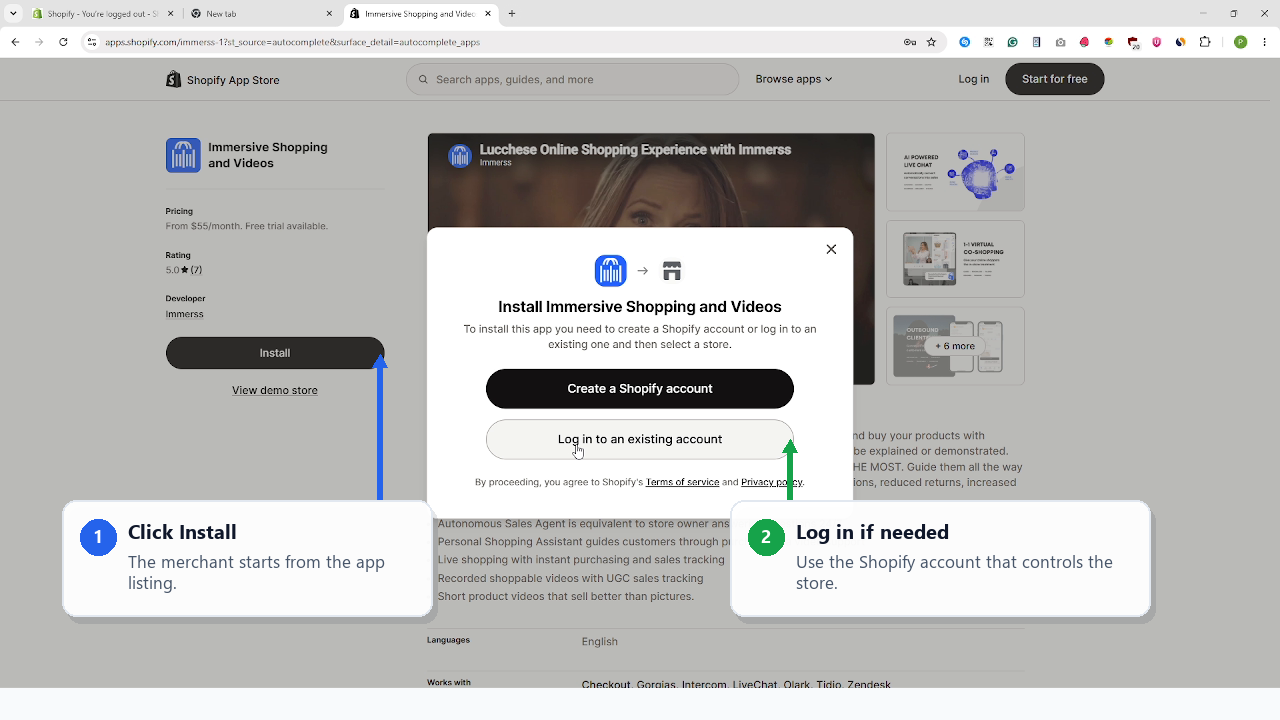
- 1Click Install
The installation starts from the app listing.
- 2Log in if needed
Use the Shopify account that controls the store.
Approve permissions
Review the access scopes and authorize the app.
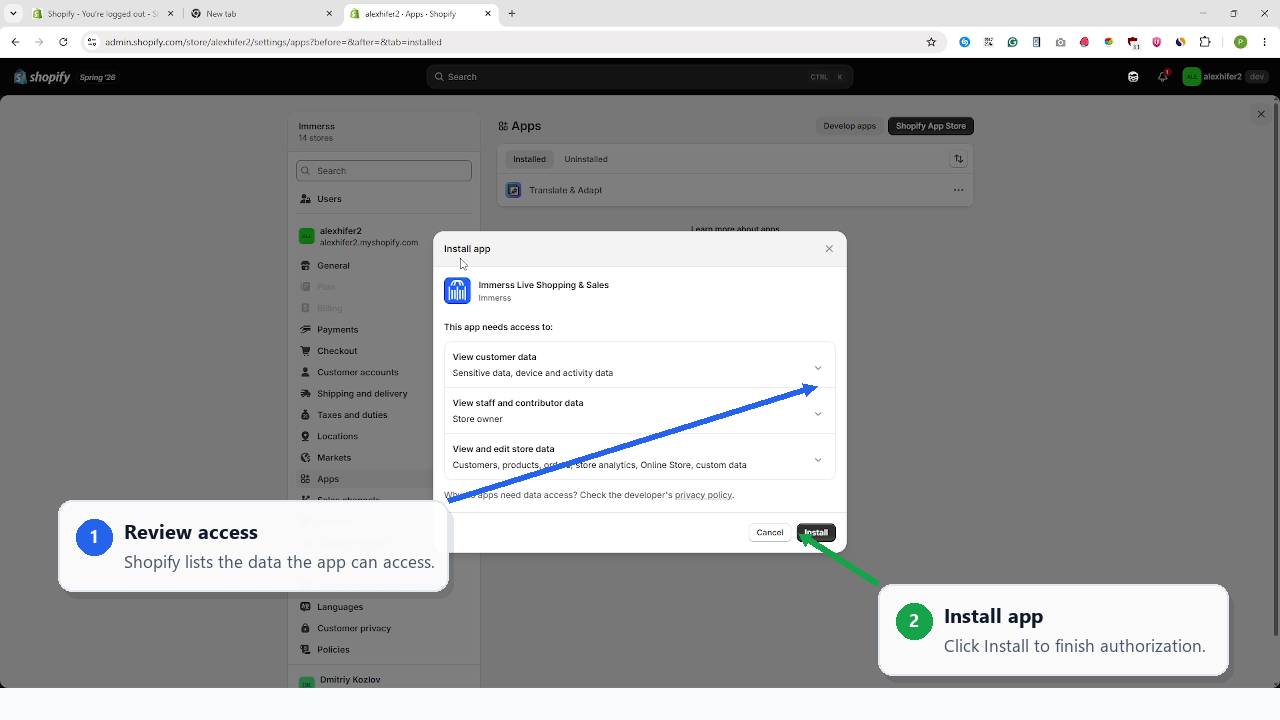
- 1Review access
Shopify lists the data the app can access.
- 2Install app
Click Install to finish authorization.
Connect your Immerss account
Sign in on the left, or register a new Immerss account on the right.
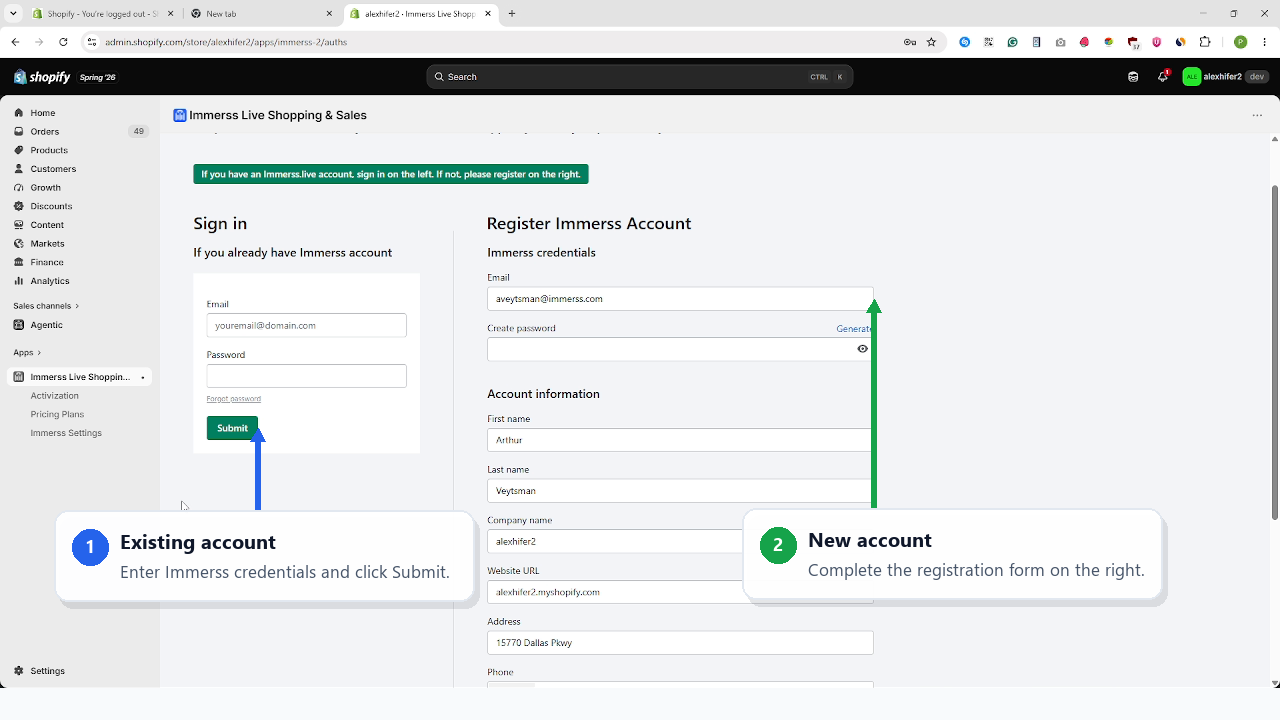
- 1Existing account
Enter your Immerss credentials and submit.
- 2New account
Complete the registration form on the right.
Activate scripts
In the Shopify app Activation, click Activate for each required storefront script.
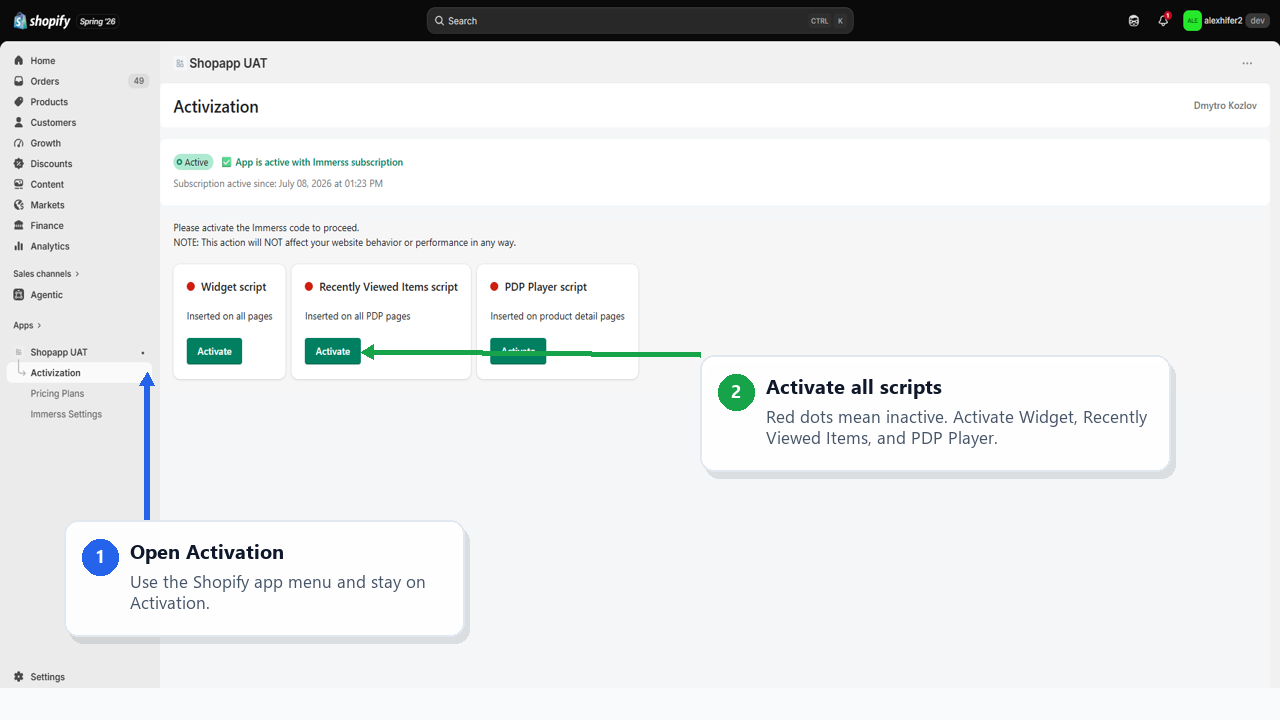
- 1Open Activation
Use the Shopify app menu and go to Activation.
- 2Activate all scripts
Turn on Widget, Recently Viewed Items, and PDP Player — red dots mean inactive.
Enable app embeds
Shopify opens the theme editor for the embedded blocks.
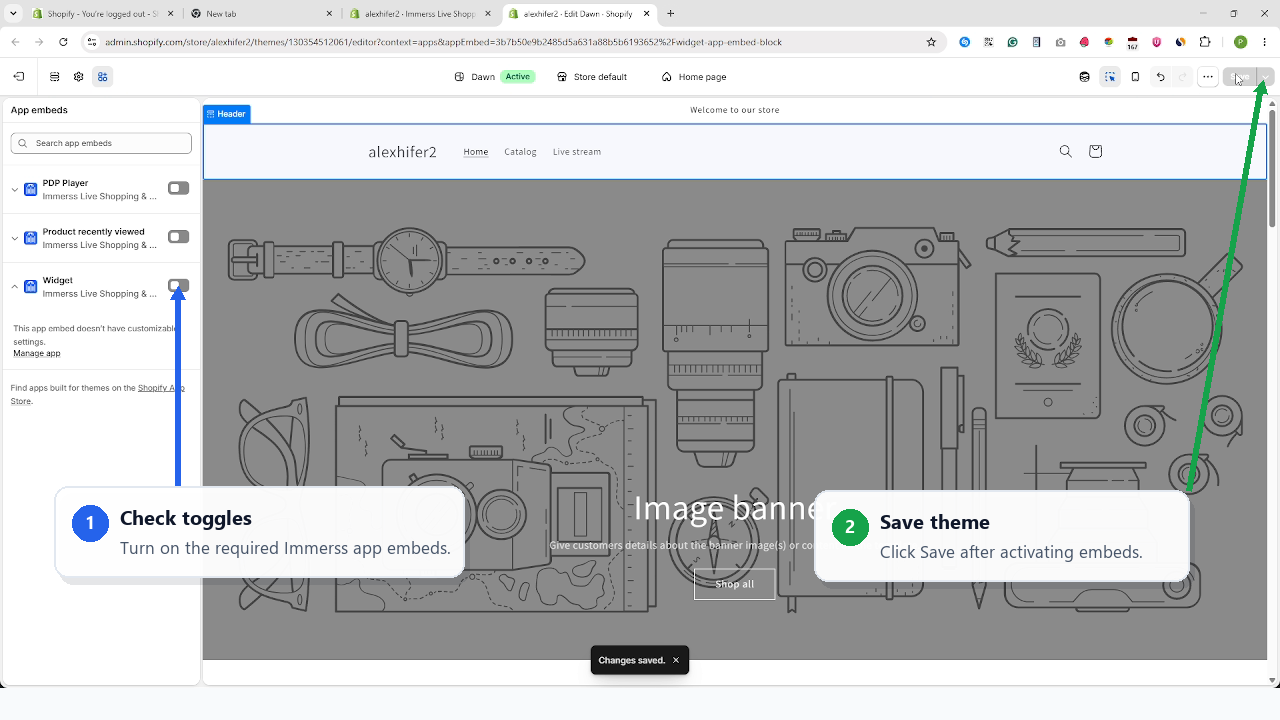
- 1Check the toggle
Turn on the required Immerss app embed.
- 2Save the theme
Click Save after activating the embeds.
Open Pricing Plans
In the Shopify app, open Pricing Plans and click Select Plan.
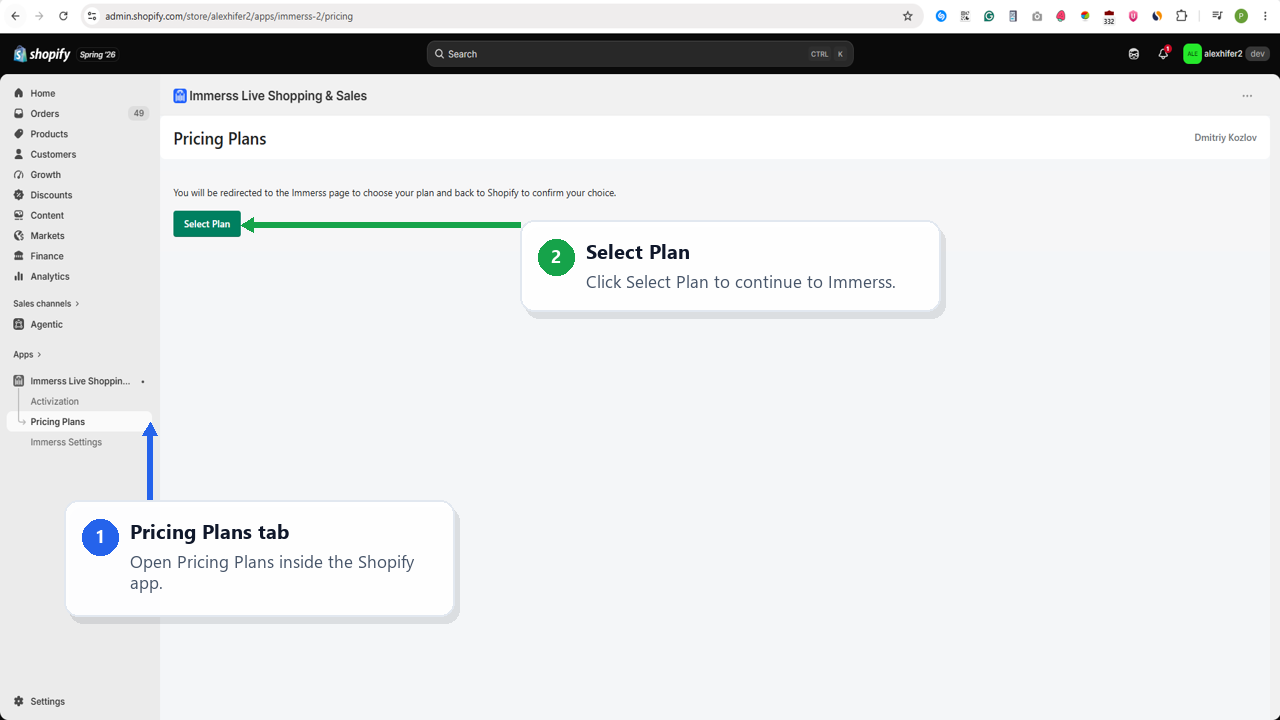
- 1Pricing Plans tab
Open Pricing Plans inside the Shopify app.
- 2Select Plan
Click Select Plan to continue to Immerss.
Choose the Custom-Built AI Sales Agent
Select the Custom-Built AI Sales Agent plan in Immerss.
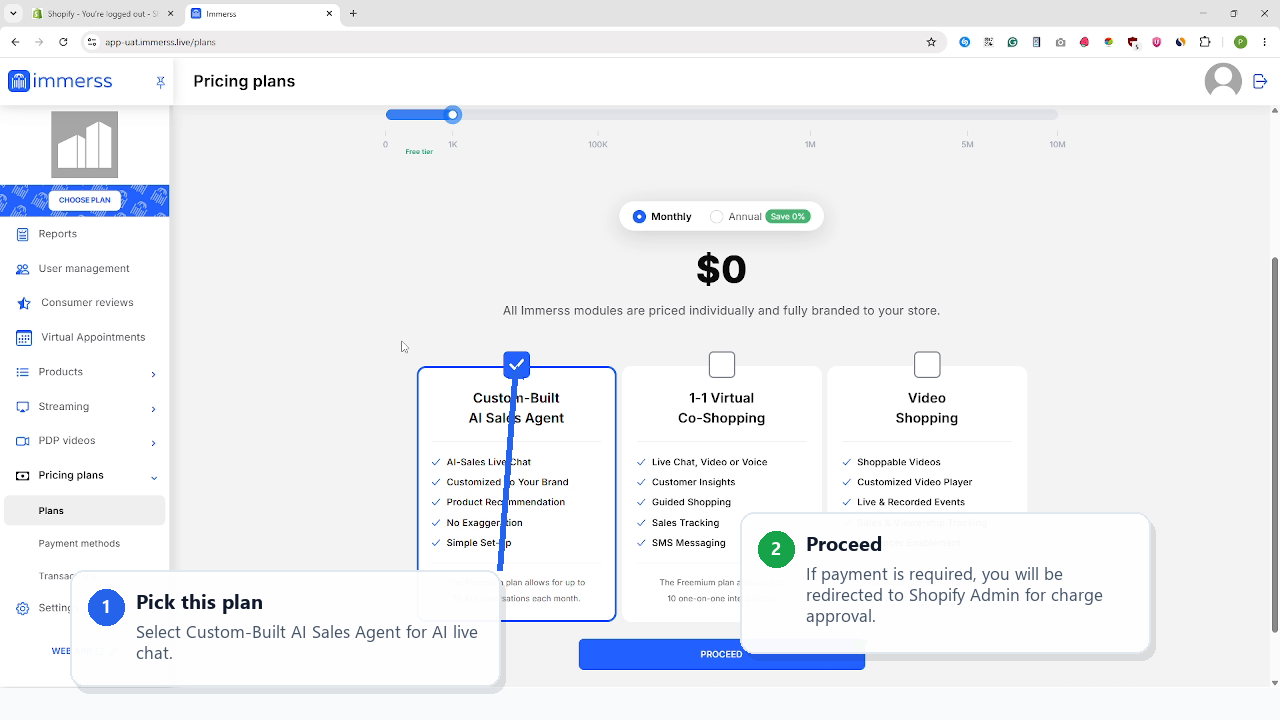
- 1Pick this plan
Select the Custom-Built AI Sales Agent plan.
- 2Proceed
If payment is required, you’ll be redirected to Shopify Admin for charge approval.
Open Immerss Settings
After approving the plan in Shopify Admin, open Immerss Settings and click Configure Immerss.
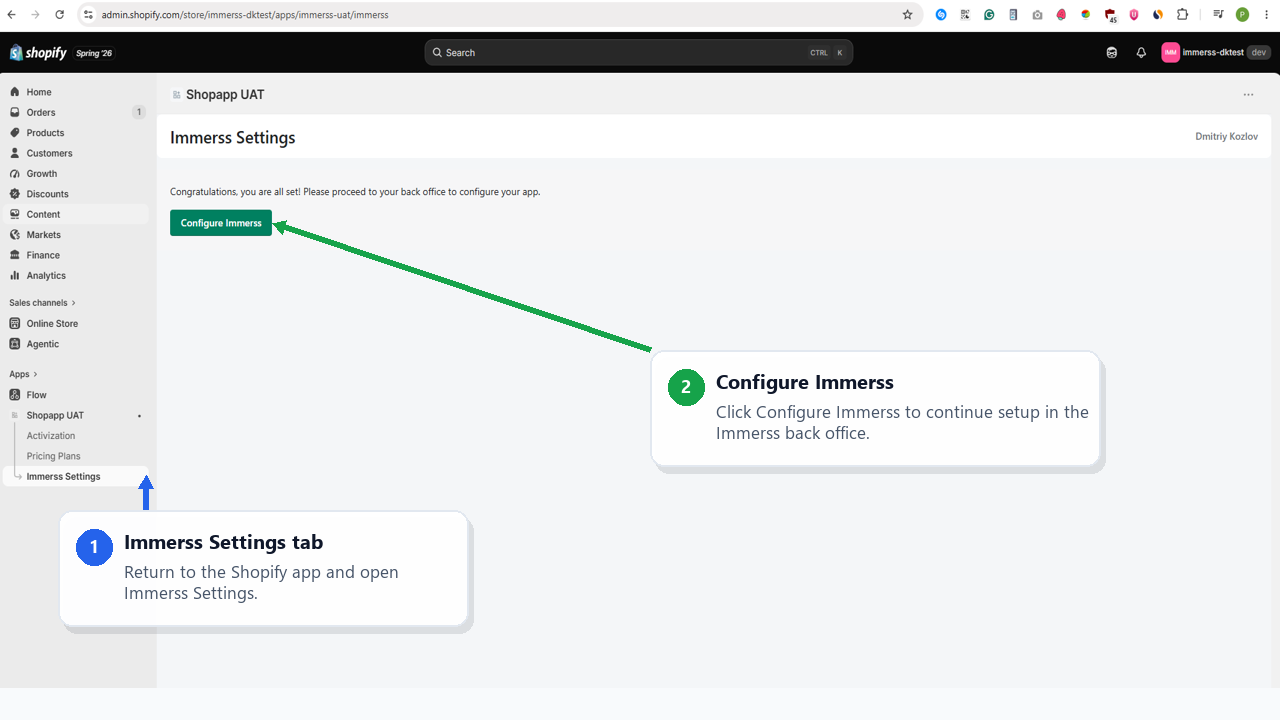
- 1Immerss Settings tab
Return to the Shopify app and open Immerss Settings.
- 2Configure Immerss
Click Configure Immerss to open the Immerss back office.
Branding
Open Settings > Branding to upload the logo and set brand colors.
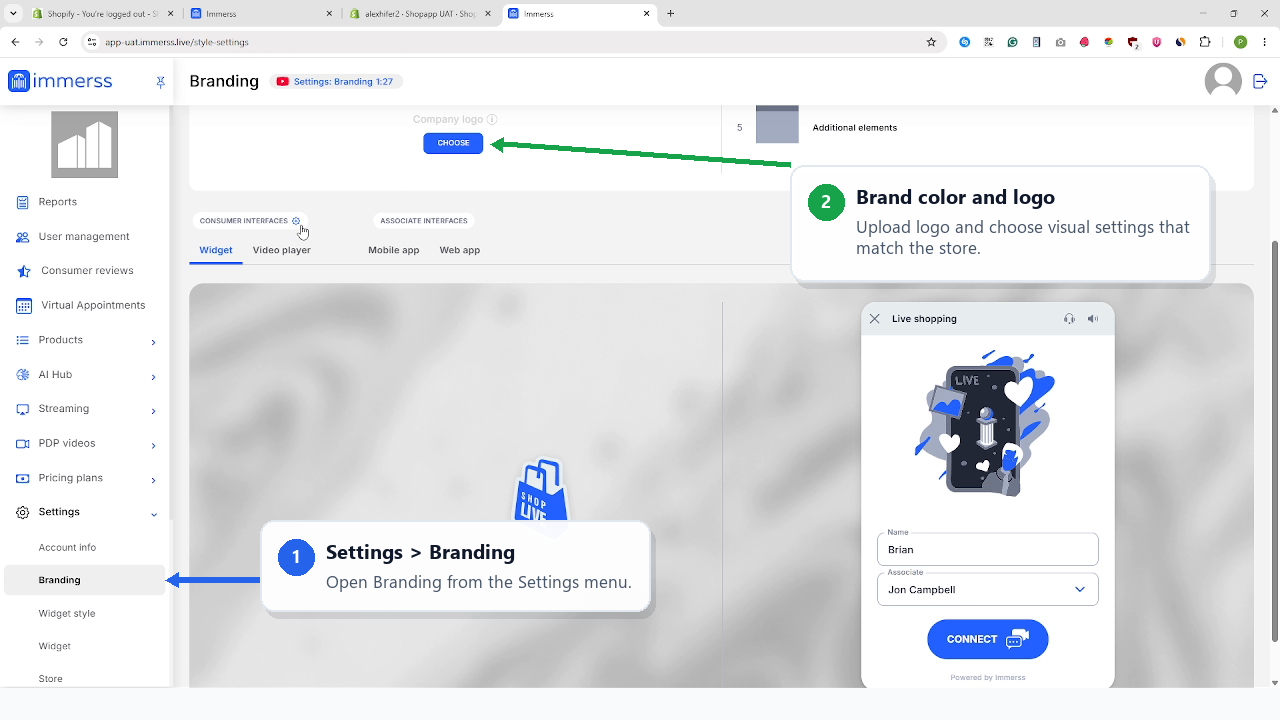
- 1Open Branding
Open Branding from the Settings menu.
- 2Brand color and logo
Upload the logo and choose visuals that match the store.
Widget style
Tune the widget icon, placement, and desktop / mobile behavior.
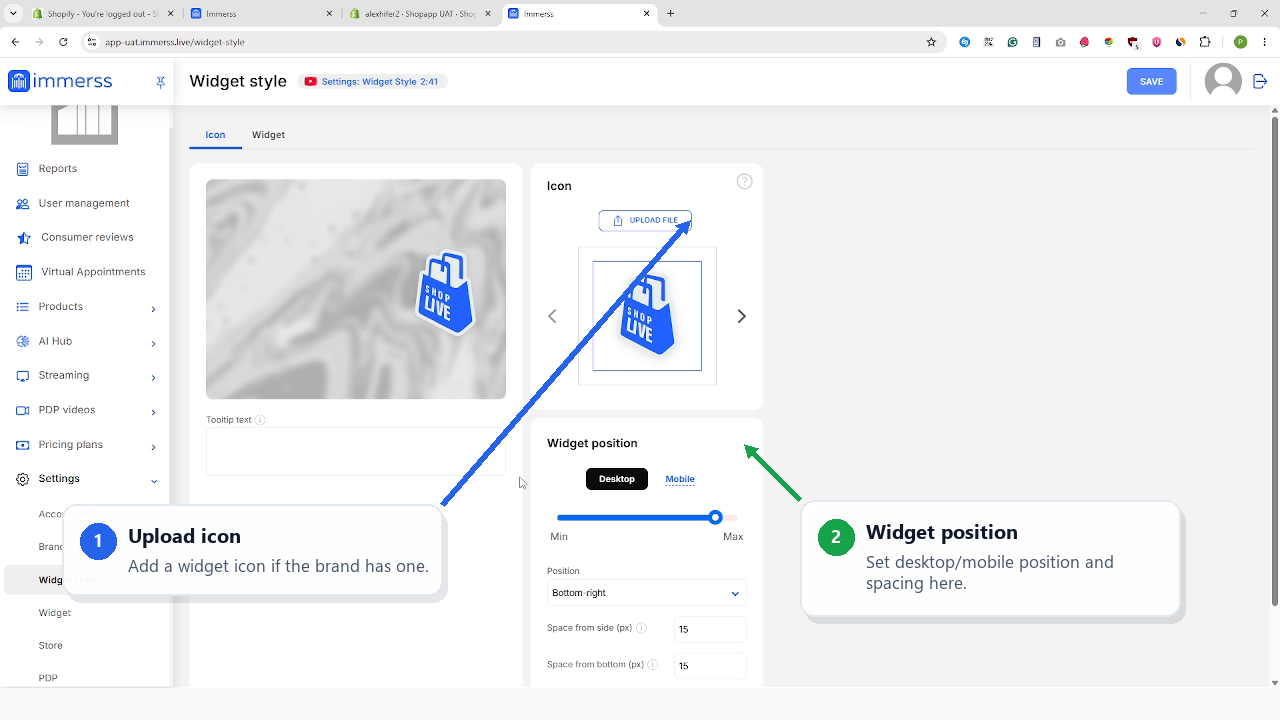
- 1Upload icon
Add a widget icon if the brand has one.
- 2Widget position
Set desktop / mobile position and spacing.
Widget visibility & schedule
Turn the widget on and set its availability schedule.
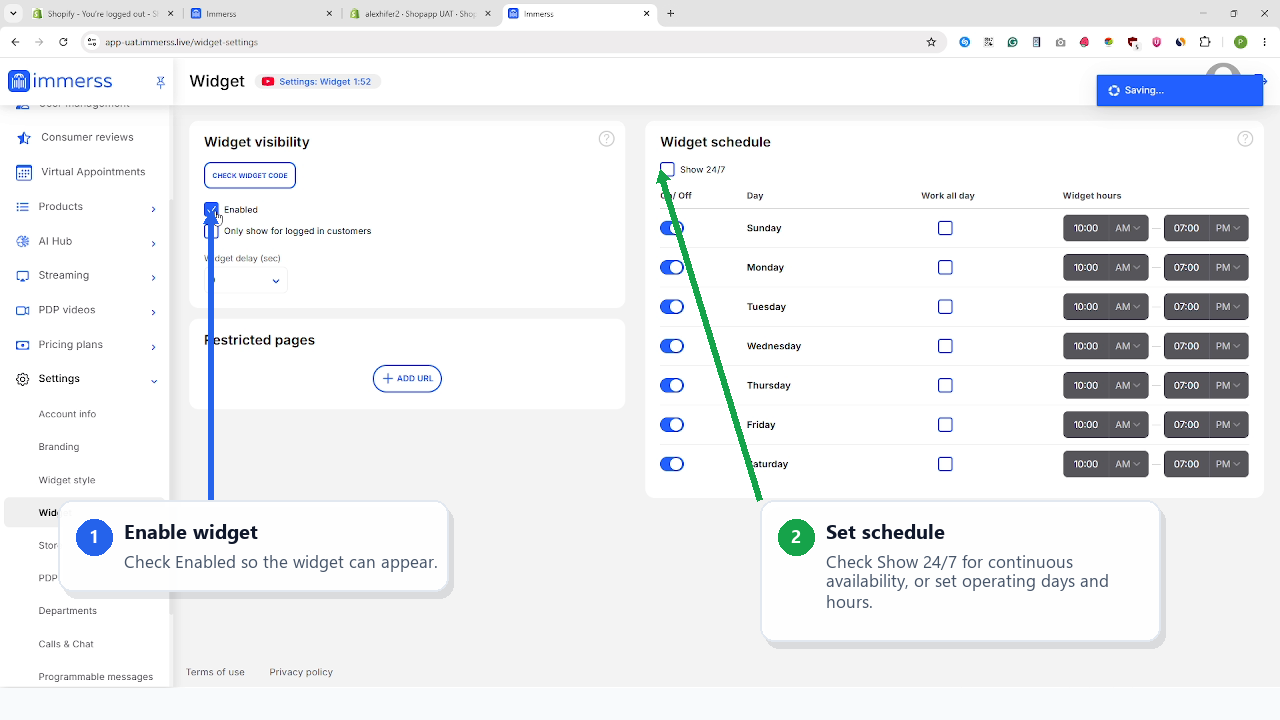
- 1Enable widget
Check Enabled so the widget appears.
- 2Set schedule
Choose Show 24/7, or set operating days and hours.
Programmable Messages
Configure the Chat in progress stage — not Chat initialization.
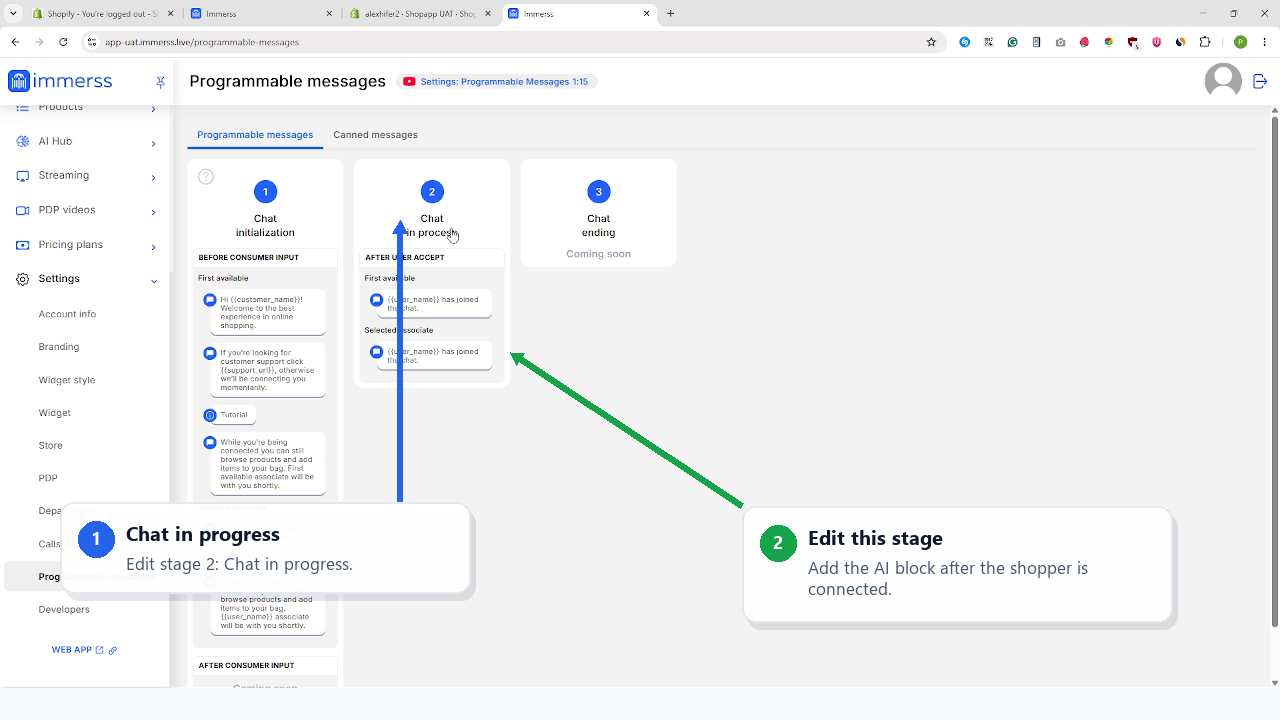
- 1Chat in progress
Edit the Chat in progress stage.
- 2Edit this stage
Add the block after the shopper is connected.
Add “AI initiates chat”
Add AI initiates chat under both routing sections, then save the flow.
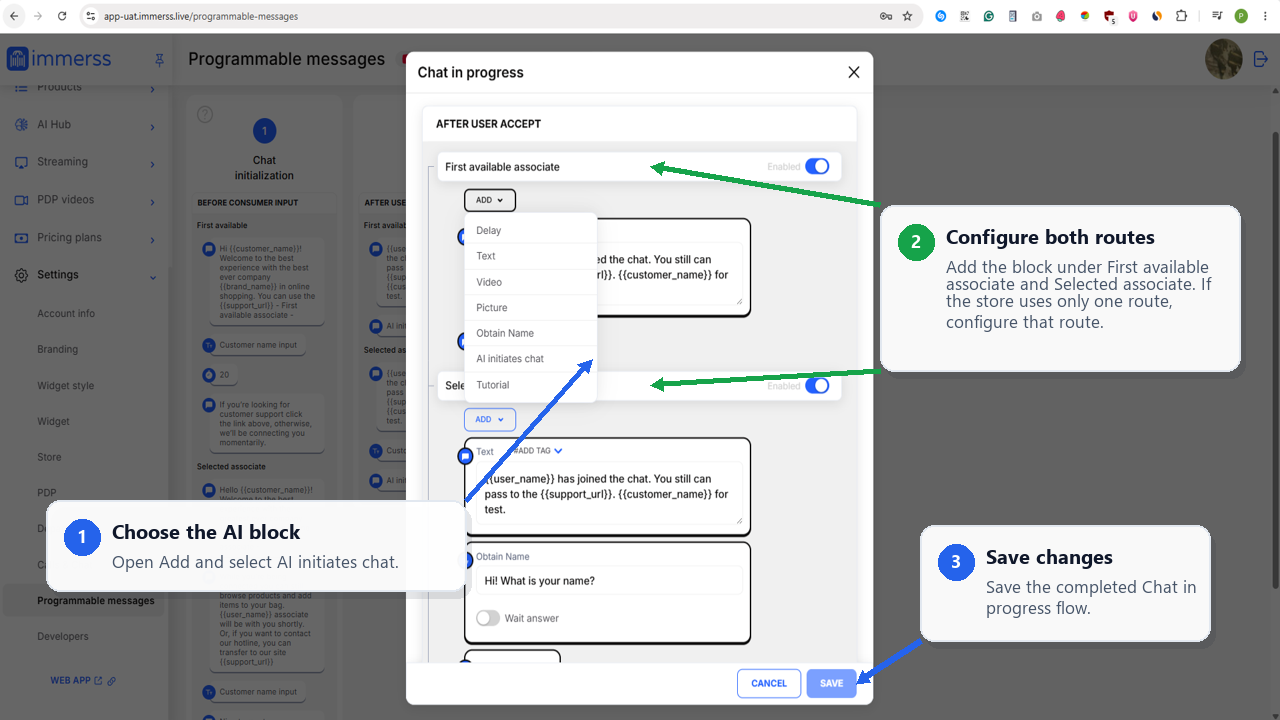
- 1Choose the AI block
Open Add and select AI initiates chat.
- 2Configure both routes
Add it under first-available and selected-associate routing (or the one route you use).
- 3Save changes
Save the completed Chat in progress flow.
Configure the AI Agent
In AI Hub > Settings, turn on the agent, set its identity, and add Brand Instructions.
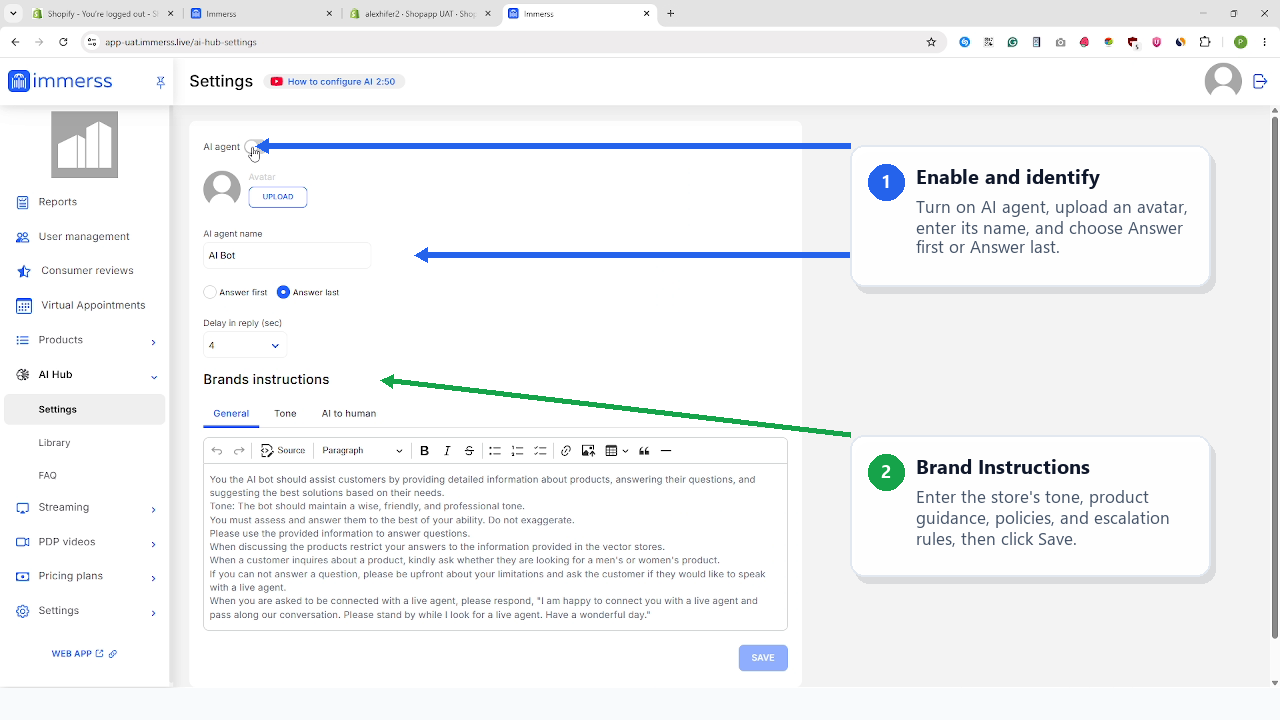
- 1Enable and identify
Turn on the agent, add an avatar, name, and answer behavior.
- 2Brand Instructions
Add the store’s tone, product guidance, policies, and escalation rules, then save.
Open AI Hub > Library
Your Shopify catalog syncs automatically. Use the Library to add extra store knowledge for the AI.
- 1Open Library
In the Immerss back office, open AI Hub > Library.
- 2Add knowledge
The catalog is already synced — add documents, pages, or notes here.
Upload a Library file
Keep File selected, upload the document, choose its group, and add it to the Library.
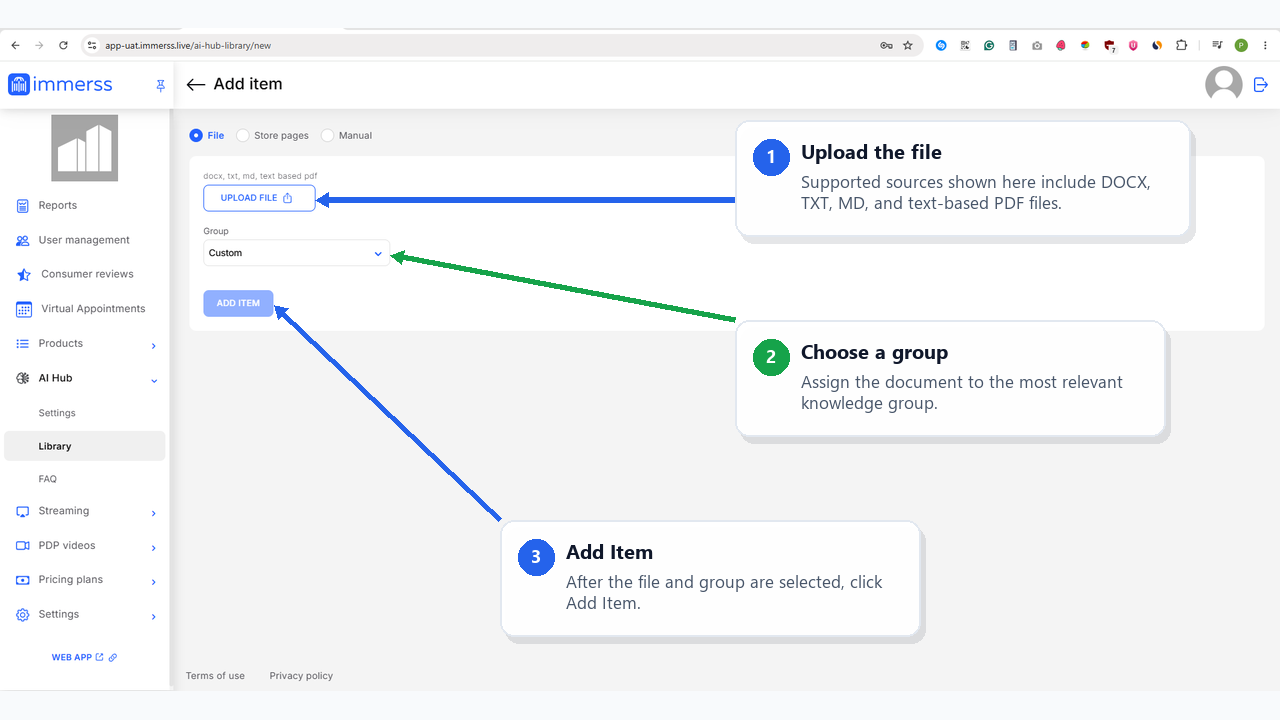
- 1Upload the file
Supported: DOCX, TXT, MD and text-based PDF.
- 2Choose a group
Assign it to the most relevant knowledge group, then Add item.
Add a store page
Use Store pages to pull in extra public store content by URL.
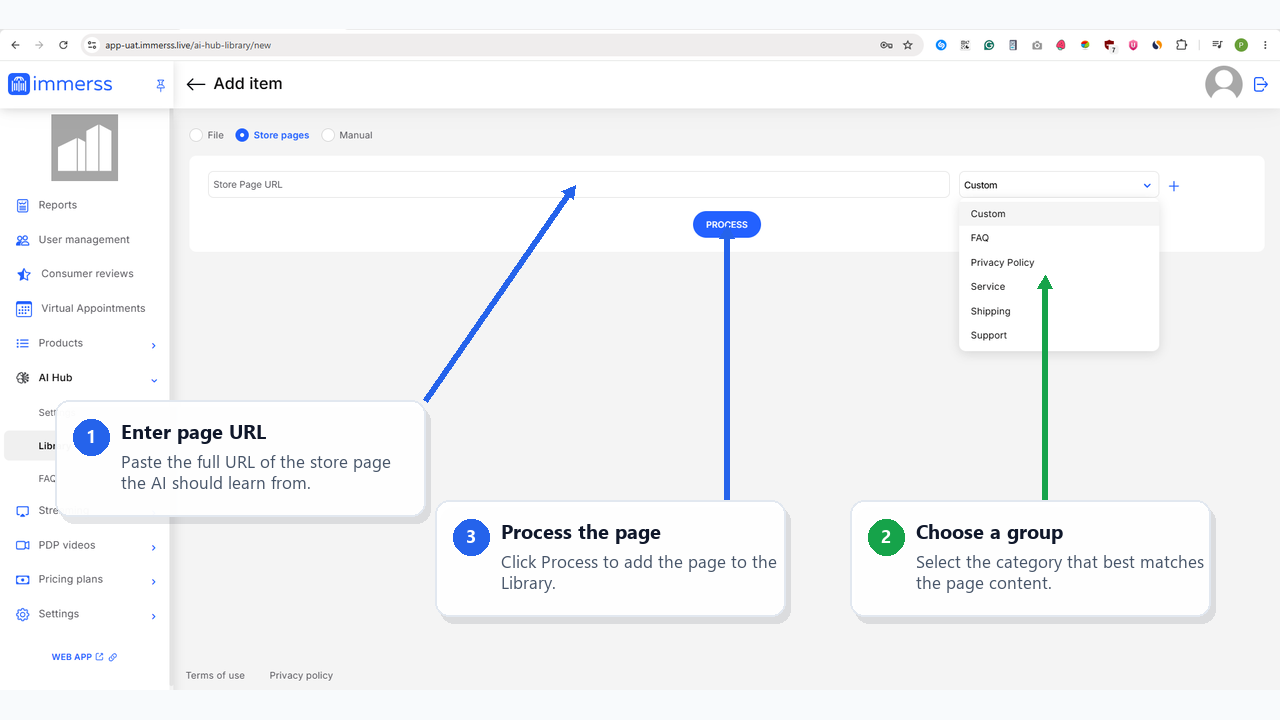
- 1Enter the page URL
Paste the URL of the public store page to ingest.
- 2Process the page
Immerss pulls it into the Library — pick a group.
Add manual knowledge
Use Manual for approved information that isn’t in a file or on a store page.
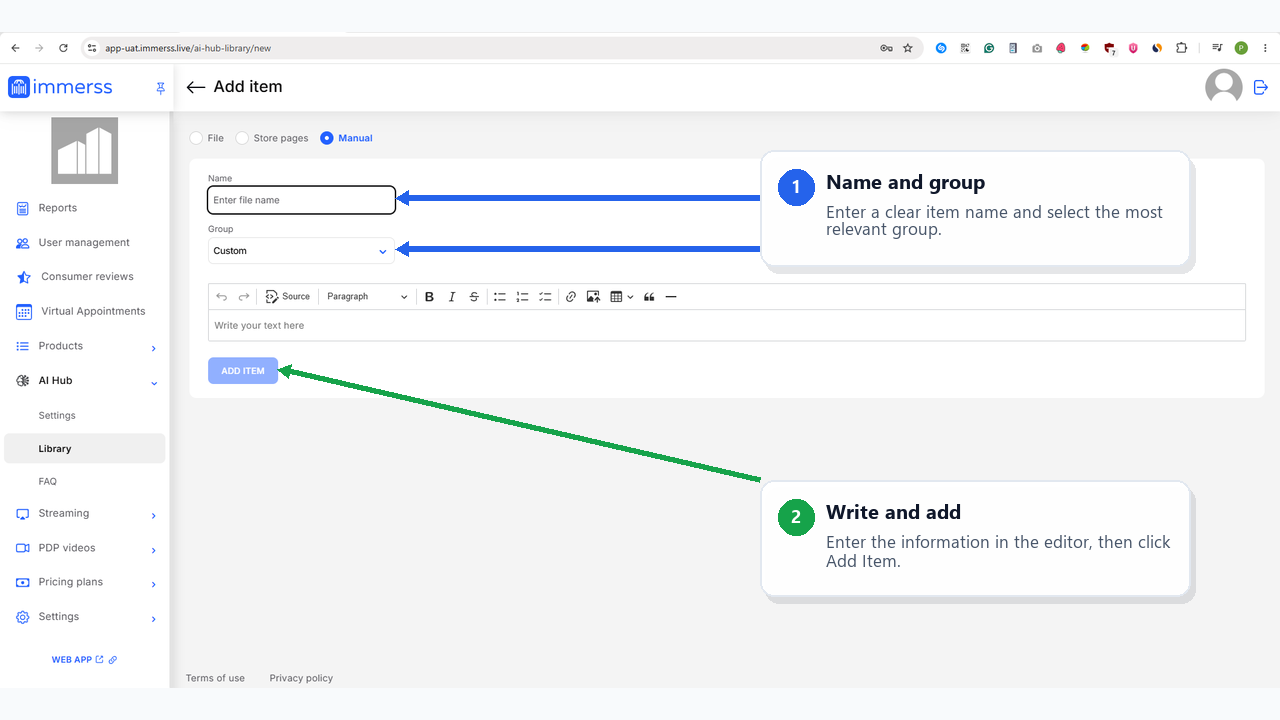
- 1Name and group
Give it a clear name and select the group.
- 2Write and add
Enter the approved information, then Add item.
Confirm Library status
New items show Pending while processing; they’re live to the AI at Ready.
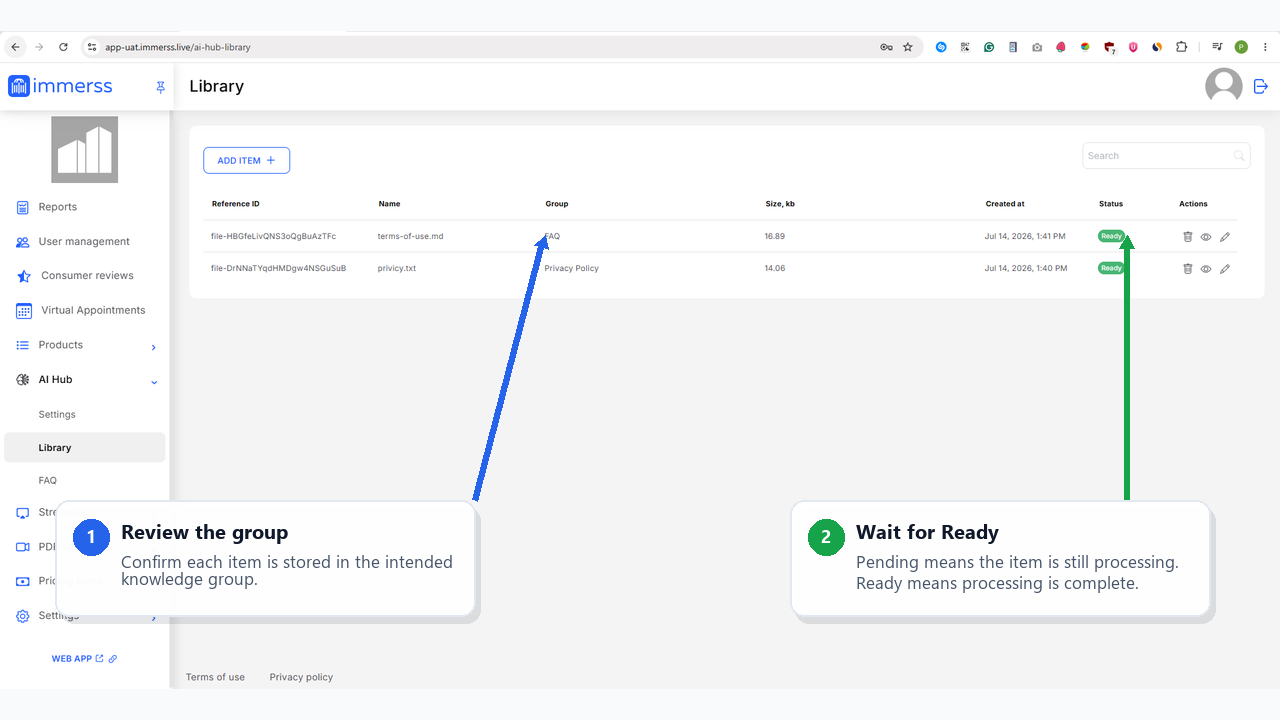
- 1Review the group
Confirm the item landed in the right group.
- 2Wait for Ready
Pending means it’s still processing; Ready means it’s live to the AI.
Open AI Hub > FAQ
Add direct question-and-answer pairs for common shopper questions.
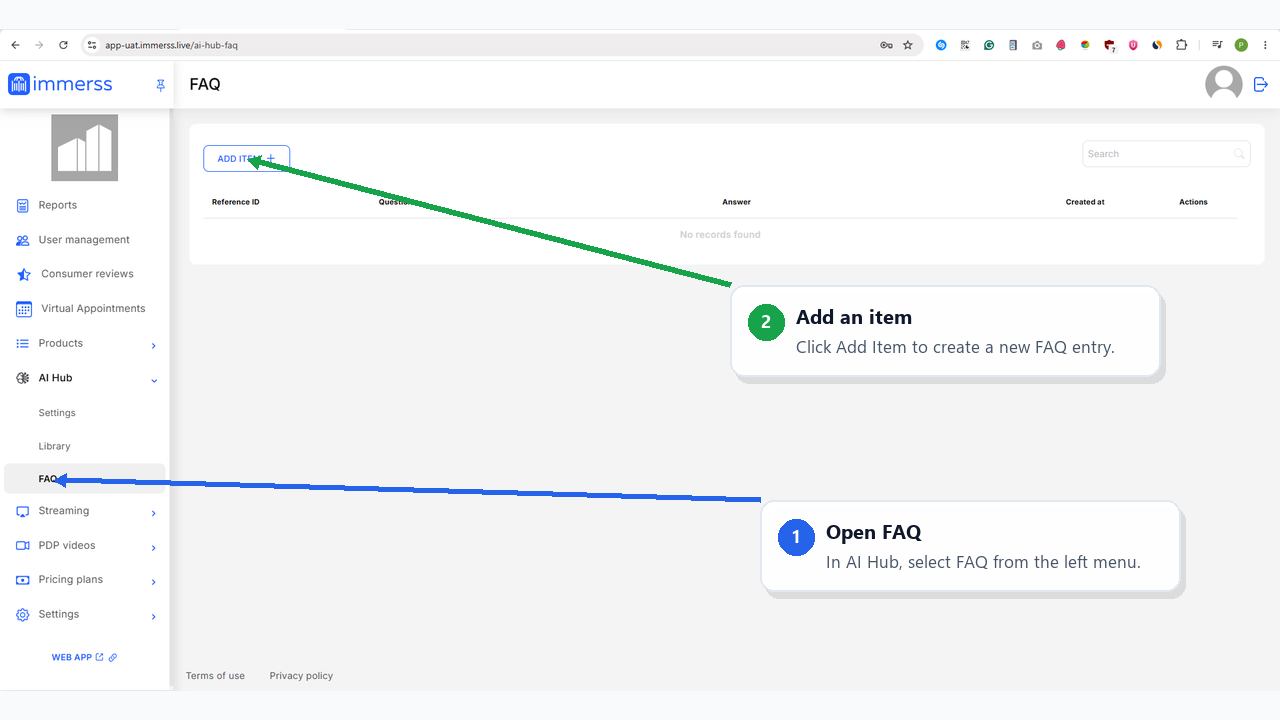
- 1Open FAQ
In AI Hub, select FAQ.
- 2Add an item
Click Add to create a new FAQ entry.
Add an FAQ answer
Enter the shopper’s question and the approved answer, then save the FAQ item.
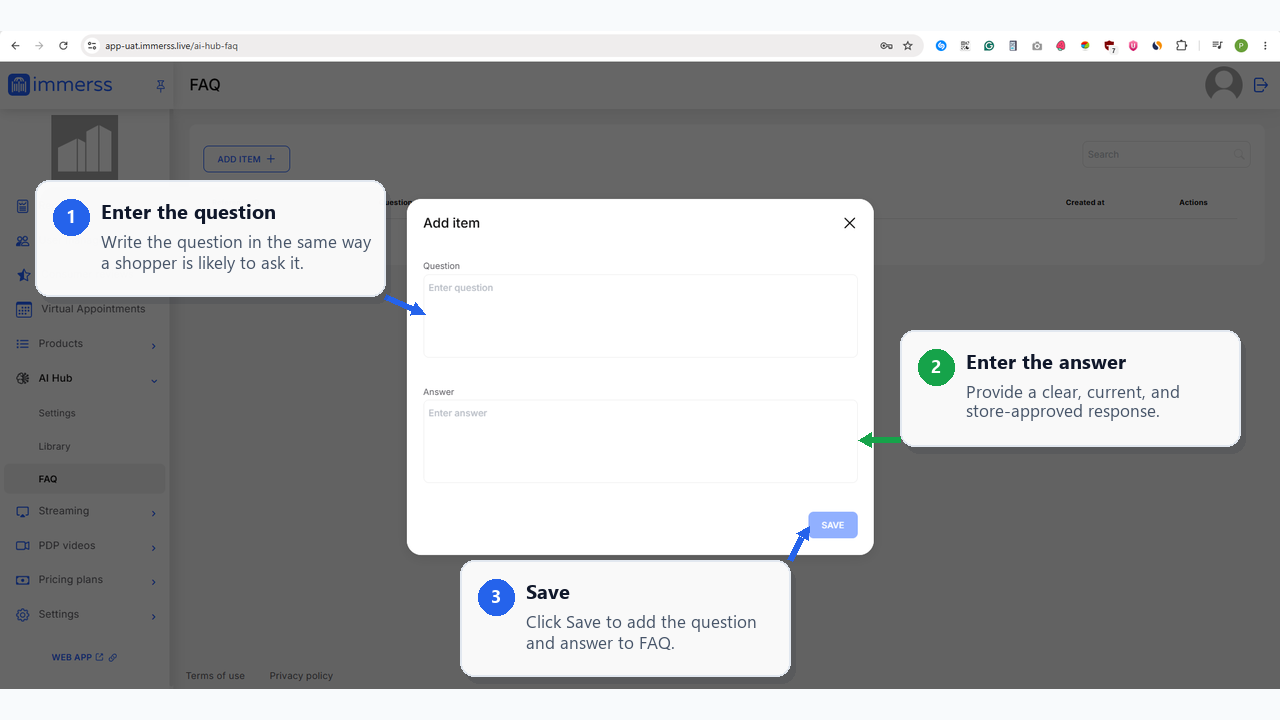
- 1Enter the question
Write it the way a shopper would ask.
- 2Enter the answer
Give a clear, approved answer, then Save.
Confirm the FAQ item
Check that the new question and answer appear in the FAQ list.
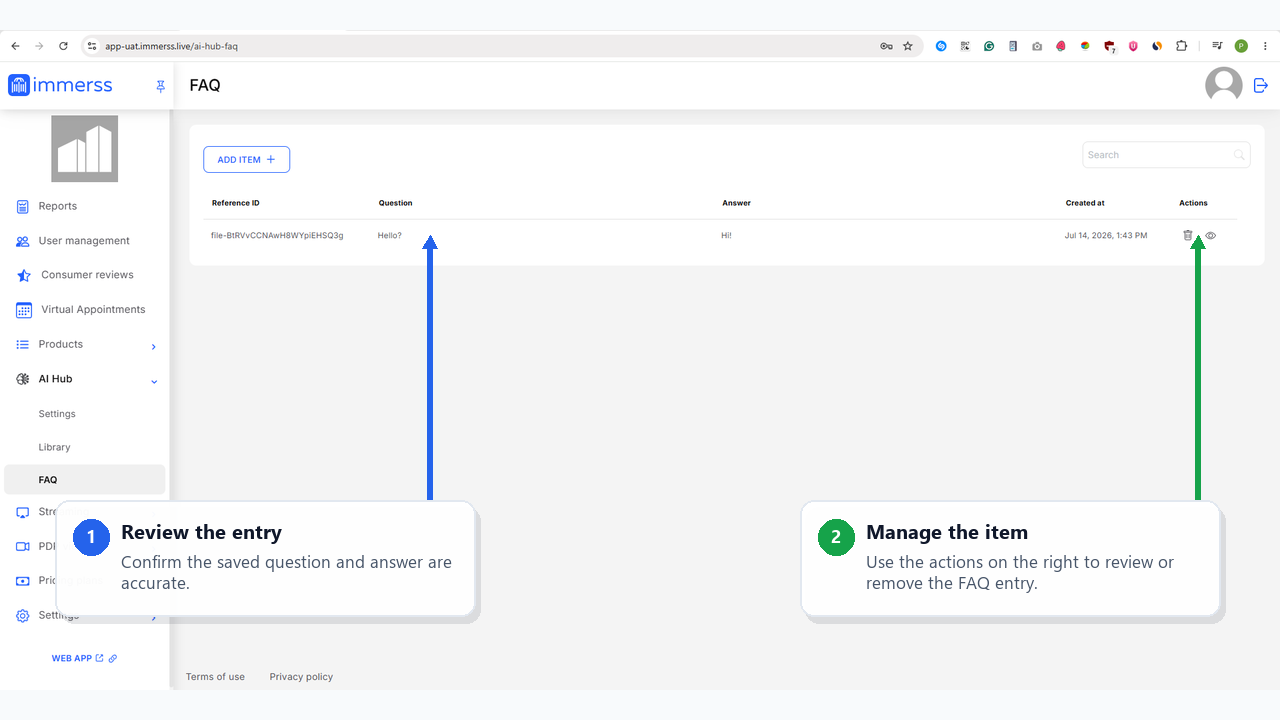
- 1Review the entry
Confirm the saved Q&A appears in the list.
- 2Manage the item
Use the row actions to review or edit.
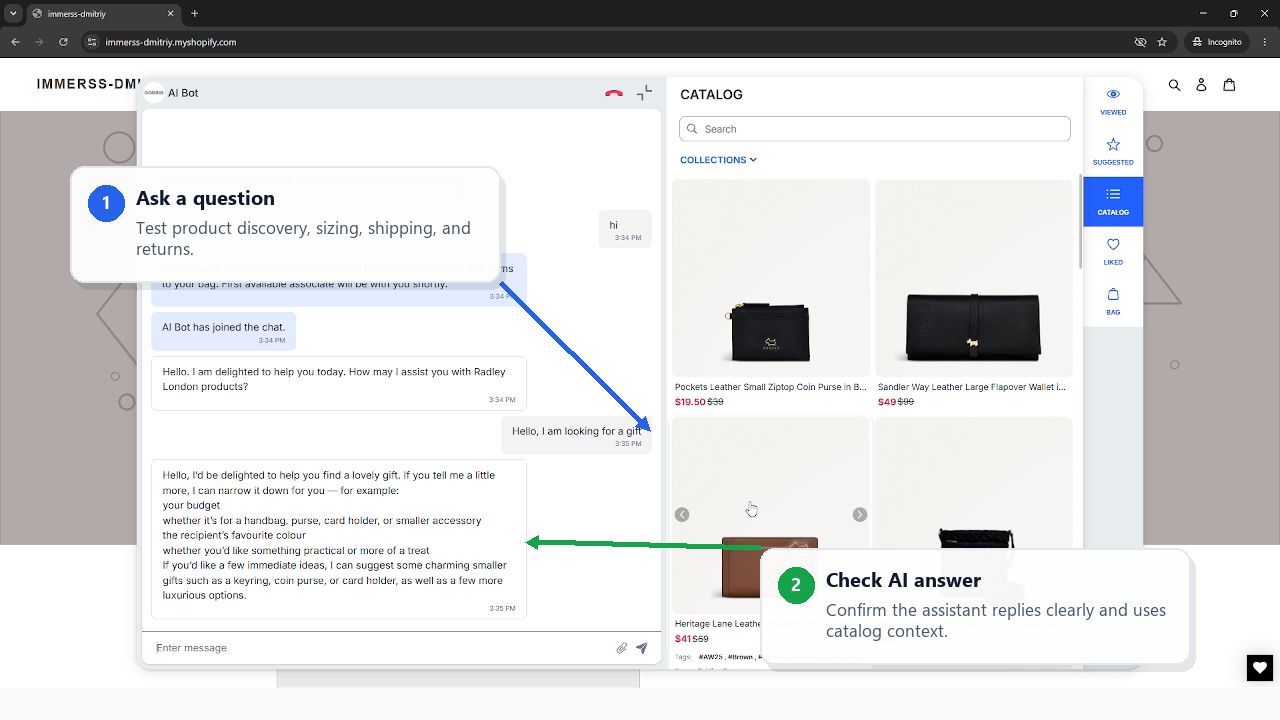
Test the storefront
Open the store, start a chat, and ask a real shopper question.
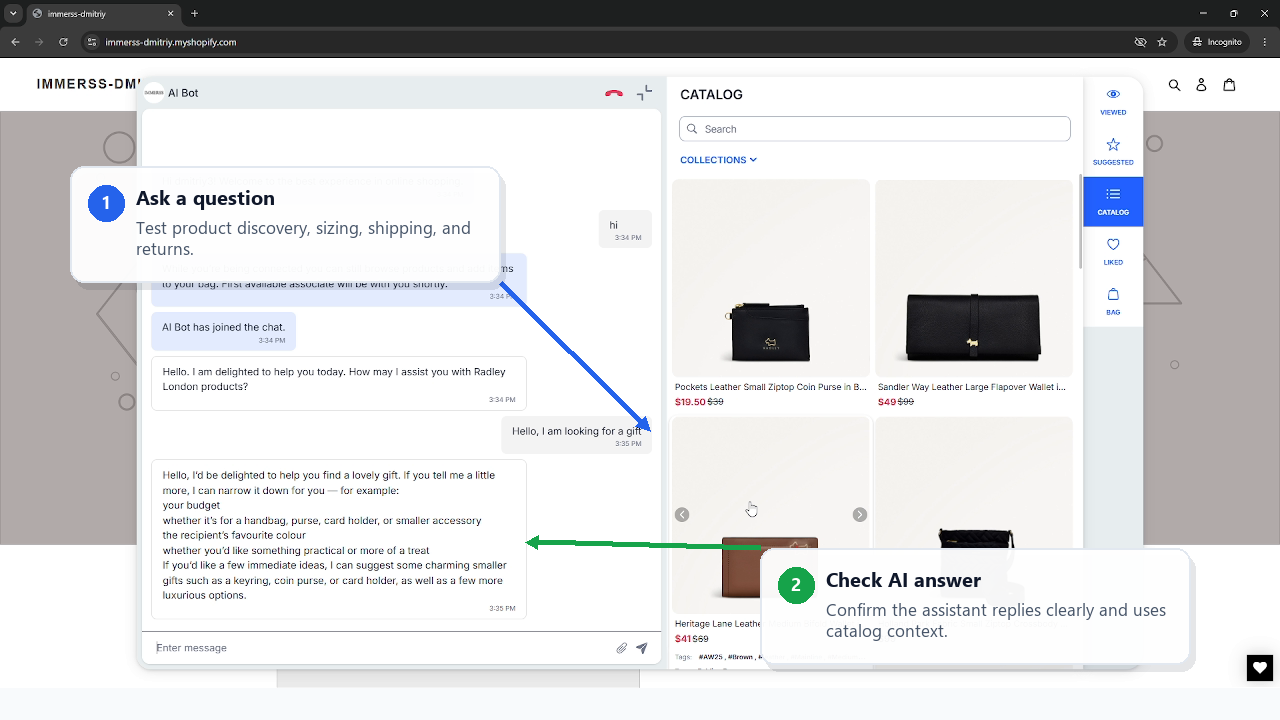
- 1Ask a question
Test product discovery, sizing, shipping, returns.
- 2Check the AI answer
Confirm it replies clearly using catalog + your added knowledge.
Launch checklist
Use this after setup to confirm the store is ready to go live.
- 1 Shopify app installed for the correct store
- 2 Immerss account connected or created
- 3 Storefront scripts and app embeds activated
- 4 Custom-Built AI Sales Agent plan selected and Shopify charge approved
- 5 Immerss Settings opened and Configure Immerss selected
- 6 Widget branding, style, and visibility configured
- 7 AI initiates chat added to each Chat in progress routing section in use
- 8 AI Agent avatar, name, answer behavior, and instructions configured
- 9 Additional Library knowledge grouped and showing Ready
- 10 FAQ questions and approved answers added
- 11 Storefront chat tested on desktop and mobile
Draft / proof-of-concept. All 24 steps are stubbed out (skeleton). Screenshots are placeholders extracted from the PDF (with baked-in callouts) — the final build will use clean captures with the numbered callouts rendered as HTML, plus a "Download PDF" export generated from this page. Content source: the colleague's Shopify Self-Install Guide.